Amazon Elastic Kubernetes Service (EKS) is a managed Kubernetes service that simplifies deploying, managing, and scaling containerized applications using Kubernetes on AWS. It provides a reliable and secure platform for running Kubernetes clusters without needing to install, operate, or maintain your Kubernetes control plane.
Key Features
- Managed Control Plane (Master Node): EKS automates the provisioning and management of the Kubernetes control plane, including automatic patching and updates.
- Integration with AWS Services: EKS integrates natively with AWS services like IAM for authentication, VPC for networking, Elastic Load Balancing (ELB) for load balancing, Amazon CloudWatch for monitoring, and more.
- Elastic Scalability: EKS allows you to scale your applications up and down easily with Kubernetes-native tools like Cluster Autoscaler and Horizontal Pod Autoscaler.
- Highly Available: The control plane spans multiple Availability Zones (AZs) to ensure high availability.
- Security: Integration with AWS Identity and Access Management (IAM) enables role-based access controls (RBAC), and features like private VPC support and encryption ensure a secure environment.
- Flexible Worker Node Management: You can choose to run EKS worker nodes on Amazon EC2 instances or AWS Fargate (for serverless containers).
- Supports Latest Kubernetes Versions: AWS EKS regularly updates and supports new Kubernetes versions, allowing you to take advantage of the latest Kubernetes features and improvements.
Common Use Cases
- Microservices: EKS helps manage large microservice architectures by orchestrating containers across various environments.
- CI/CD Pipelines: EKS integrates well with tools like Jenkins, GitLab, and CodePipeline to automate deployment pipelines.
- Machine Learning: You can run ML workloads using frameworks like TensorFlow or PyTorch, utilizing GPU-backed EC2 instances for training models.
- Hybrid Deployments: EKS supports hybrid architectures where you can deploy Kubernetes clusters on-premises using Amazon EKS Anywhere.
How to Get Started with EKS
- Create an EKS Cluster: You can create an EKS cluster using the AWS Management Console, AWS CLI, or an Infrastructure-as-Code tool like Terraform or CloudFormation.
- Configure kubectl: Connect your local kubectl to your EKS cluster using the AWS CLI and the aws eks update-kubeconfig command.
- Deploy Applications: Use standard Kubernetes manifests (yaml files) to deploy and manage containerized applications.
Example: Setting up a multinode (3 AWS EC2 nodes) kubernetes cluster using AWS EKS from AWS CLI. We will than deploy a simple NGNIX service into it.
Prerequisites
- AWS CLI:
- AWS IAM user: Create and ensure that your AWS IAM user has the required permissions for EKS, EC2, VPC and IAM.
- Create an IAM user (Just for a quick demo attached AdministratorAccess policy)
- Than, login your AWS account with command 'aws configure' from AWS CLI
- docker
- kubectl: Install Kubernetes command-line tool to interact with your EKS cluster.
- eksctl (Optional but recommended): A simple CLI tool to create and manage EKS clusters.
Step-1 (Optional): Create a new VPC for the EKS cluster
- It is an optional step, If you don't create a new VPC it will use the default existing one to setup AWS EKS cluster.
- If you don't have a suitable VPC, you can create one using AWS CloudFormation or manually configure it.
- Here's a simple CloudFormation template to create the necessary VPC components for EKS.
- Replace <region-name> as per your choice of region e.g. ap-south-1 for mumbai.
aws cloudformation create-stack \
--region <region-name> \
--stack-name my-eks-vpc \
--template-url https://amazon-eks.s3.us-west-2.amazonaws.com/cloudformation/2020-08-12/amazon-eks-vpc-sample.yaml

This command will create a VPC with subnets, route tables, and necessary Internet Gateways suitable for EKS.
Step 2: Create an AWS EKS cluster
- You can create AWS EKS cluster either using eksctl (Recommended) or using AWS Management Console (GUI panel)
- You can easily create a AWS EKS cluster using eksctl with one following command
eksctl create cluster \
--name my-eks-cluster \
--region <region-name> \
--nodegroup-name my-nodes \
--node-type t3.medium \
--nodes 3 \
--nodes-min 1 \
--nodes-max 4 \
--managed
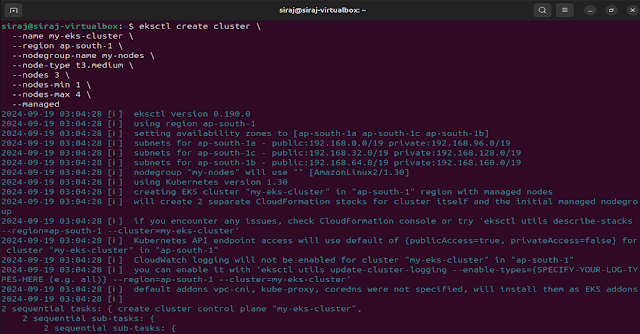
This command creates an EKS cluster in the specified region, creates a managed node group with 3 t3.medium EC2 instances, configures auto-scaling with a minimum of 1 and a maximum of 4 nodes.
- You can verify cluster setup. E.g. Check cluster nodes with commands 'kubectl get nodes'
Step-3: Configure kubectl to access the EKS cluster
- Run the following command to update your kubeconfig
aws eks --region <region-name> update-kubeconfig --name my-eks-cluster
- You can verify that kubectl is properly configured by running
kubectl get services
You should see a list of Kubernetes services, including the kubernetes service for the cluster.
Step-4: Deploy an application (nginx service) into your EKS cluster using kubernetes manifests.
mkdir project_workspace
cd project_workspace
- Create a simple deployment manifest (nginx-deployment.yaml)
apiVersion: apps/v1
kind: Deployment
metadata:
name: nginx-deployment
spec:
replicas: 2
selector:
matchLabels:
app: nginx
template:
metadata:
labels:
app: nginx
spec:
containers:
- name: nginx
image: nginx:1.19.10
ports:
- containerPort: 80
- Apply the manifest
kubectl apply -f nginx-deployment.yaml
- Create a simple service manifest (nginx-service.yaml). Expose the deployment using a LoadBalancer service
apiVersion: v1
kind: Service
metadata:
name: nginx-service
spec:
selector:
app: nginx
ports:
- protocol: TCP
port: 80
targetPort: 80
type: LoadBalancer
- Apply the service manifest
kubectl apply -f nginx-service.yaml
- Get the external IP of the service
kubectl get service nginx-service

- You can now fire various kubectl commands against this cluster.
Step-5: Access deployed nginx service using provided external IP

Step-6 (Optional): Enable AWS EKS cluster autoscaler
- You can enable the Kubernetes Cluster Autoscaler to dynamically scale your node group based on workload demand.
- Deploy the kubernetes cluster autoscaler
kubectl apply -f https://github.com/kubernetes/autoscaler/releases/download/cluster-autoscaler-1.19.1/cluster-autoscaler-autodiscover.yaml
- Update the Cluster Autoscaler deployment to include your cluster's name
kubectl -n kube-system edit deployment.apps/cluster-autoscaler
Here, In the container spec, set the following environment variable with your cluster name
- name: CLUSTER_NAME
value: my-eks-cluster
Step-6: Clean up resources (Delete the EKS cluster and associated resources)
eksctl delete cluster --region <region-name> --name my-eks-cluster
- Clean up CloudFormation stack (Delete VPC and associated subnets and other resources)
aws cloudformation --region <region-name> delete-stack --stack-name my-eks-vpc