System Design in Practice


1. Performance Optimization

Read & Write Optimization

    1. Read-Heavy Systems → Use Caching to reduce database load.
    • Implement Redis (In-Memory Cache) for frequently accessed data.
    • Use Memcached for lightweight key-value caching.
    • Bloom Filters to avoid unnecessary DB queries (e.g., checking if an element exists before querying).
    • CDN (Cloudflare, AWS CloudFront, Akamai) for caching static and dynamic content at the edge.
    2. Write-Heavy Systems → Use Message Queues & Write-Behind Caching for async processing.
    • Kafka, RabbitMQ, AWS SQS for queueing writes and processing asynchronously.
    • Write-Behind Caching in Redis ensures that writes are batched and written to DB periodically.
    • Event Sourcing for reconstructing past application states from logs.
    3. Low Latency Requirement → Optimize request-response time.
    • Use Cache (Redis, Memcached), CDN (Akamai, CloudFront, Fastly) for data delivery.
    • Implement Connection Pooling (HikariCP, PgBouncer) to minimize DB overhead.
    • Use gRPC with Protobuf to reduce payload size and serialization/deserialization overhead.
    4. High-Performing DB Queries → Reduce query execution time.
    • Implement B-Tree, Hash Indexes, and Covering Indexes for faster lookups.
    • Use Materialized Views for precomputed results.
    • Optimize queries using EXPLAIN ANALYZE in PostgreSQL or Query Execution Plans in MySQL.
    5. Scaling SQL Databases → Avoid bottlenecks.
    • Read Replicas for read scalability (e.g., AWS RDS Read Replicas).
    • Sharding (Range, Hash, List) for distributing load across multiple nodes.
    • ProxySQL for intelligent query routing.


2. Database & Storage Strategy

Database Selection

    6. ACID-Compliant Transactions → Use SQL Databases (PostgreSQL, MySQL, Oracle, SQL Server) for strict data integrity.
    • Implement Multi-Version Concurrency Control (MVCC) for high throughput.
    • Use 2-Phase Commit (2PC) in distributed transactions.

    7. Unstructured or Schema-Free Data → Use NoSQL (MongoDB, DynamoDB, Cassandra).

    • MongoDB for flexible document storage.
    • DynamoDB (Key-Value Store, Partitioned by Hash Keys) for predictable performance.
    • Cassandra (Column-Family Storage, Peer-to-Peer Architecture) for high availability.
    8. Graph Data (Nodes, Edges, Relationships) → Use Graph Databases (Neo4j, ArangoDB, JanusGraph) for recommendations and fraud detection.

Storage Solutions

    9. Handling Large Files, Videos, or Images → Use Object Storage.

    • Amazon S3, Azure Blob, Google Cloud Storage for scalability.
    • Use S3 Multipart Uploads for large files.
    • Implement CDN-backed caching (e.g., CloudFront + S3) for fast content delivery.
    10. Analytics & Historical Data → Store in Data Lakes & Columnar Storage.
    • Use AWS Lake Formation, Delta Lake, Apache Iceberg with Parquet, ORC formats for efficient queries.
    • BigQuery & Snowflake for large-scale analytical workloads.


3. High Availability, Scalability & Reliability

Load Balancing & Scalability

    11. Ensuring High Availability & Performance → Use Load Balancers (NGINX, AWS ALB/ELB, HAProxy).
    • Implement Health Checks for automatic failover.
    • Use Sticky Sessions for session-aware routing.
    12. Scaling System Components → Implement Horizontal Scaling.
    • Kubernetes, ECS, Nomad for auto-scaling workloads.
    • Event-Driven Architecture with Kafka Streams for real-time updates.
    13. Handling Traffic Spikes → Use Auto-Scaling (Kubernetes HPA, AWS Auto Scaling, GCP Managed Instance Groups).
    • Throttling & Load Shedding for managing high traffic volumes.

Redundancy & Fault Tolerance

    14. Avoiding Single Point of Failure (SPOF) → Implement Redundancy.
    • Multi-AZ Deployments in AWS RDS for failover.
    • Active-Passive Failover (e.g., Redis Sentinel, ZooKeeper for leader election).
    15. Ensuring Fault Tolerance & Durability → Use Data Replication.
    • Master-Slave Replication (PostgreSQL, MySQL).
    • Multi-Region Replication (MongoDB, Cassandra).
    16. Failure Detection in Distributed Systems → Implement Heartbeat Mechanisms (Consul, ZooKeeper, etcd).

    17. Ensuring Eventual Consistency → Use CRDTs, DynamoDB’s Eventual Consistency Model for distributed data.


4. Security & Access Control

    18. Preventing DoS Attacks & Server Overload → Implement Rate Limiting.
    • Guava RateLimiter, API Gateway Rate-Limiting Policies.
    • Web Application Firewall (AWS WAF, Cloudflare WAF) for request filtering.
    19. Ensuring Data Integrity → Use Checksum Algorithms (SHA-256, CRC32).
    • Implement Immutable Storage for audit logs.
    20. Protecting Sensitive Data
    • AES-256 Encryption for data at rest.
    • TLS 1.3 for data in transit.
    • Role-Based Access Control (RBAC) using AWS IAM, Okta.

    21. Zero Trust Security Model

    • Identity & Access Management (IAM, OAuth, OpenID Connect, JWT)
    • Zero Trust Network (ZTNA, BeyondCorp by Google)


5. Event-Driven & Real-Time Communication

    22. Event-Driven Architecture → Use Event Streaming Platforms (Apache Kafka, AWS Kinesis, Pulsar).

    23. User-to-User Fast Communication → Use WebSockets (Socket.IO, SignalR).
    • Redis Pub/Sub, Kafka Streams for real-time messaging.


6. Advanced Search & Query Optimization

    24. High-Volume Data Search → Use Search Engines.
    • Elasticsearch, Apache Solr, Algolia for text-based queries.
    • Implement Trie, Inverted Index for faster lookups.
    25. Location-Based Data Queries → Use Geospatial Indexing.
    • PostGIS, MongoDB Geospatial Queries, Google S2 Library for geo-based applications.


7. Network & Distributed System Design

    26. Efficient Data Transfer in a Decentralized System → Use Gossip Protocol.
    • Cassandra, Consul, Serf for distributed communication.
    27. Consistent Hashing for Load Distribution → Used in DynamoDB, Memcached, Cassandra.

    28. Domain Name Resolution & Traffic Routing → Use DNS (Route 53, Cloudflare DNS) with GeoDNS, Anycast Routing.


8. Workflow & Job Processing

    29. Bulk Job Processing → Use Batch Processing.
    • Apache Spark, Hadoop, AWS Glue for large-scale data jobs.
    30. Workflow Orchestration → Use Apache Airflow, Temporal, AWS Step Functions.


9. Observability & Monitoring

   31. Ensuring System Health & Performance → Implement Logging, Monitoring & Tracing
    • Centralized Logging → Use ELK Stack (Elasticsearch, Logstash, Kibana), AWS CloudWatch, Loki.
    • Distributed Tracing → OpenTelemetry, Jaeger, Zipkin for tracing microservices interactions.
    • Metrics Collection → Prometheus, Grafana for real-time system metrics.
    • Error Tracking & Alerting → Sentry, Datadog, PagerDuty for proactive issue detection.

   32. Data Pipeline & ETL Processing

    • Data Streaming Pipelines: Apache Flink, Kafka Streams, AWS Glue.
    • ETL vs ELT: Understanding when to extract, transform, and load vs. extracting and transforming later.
    • Real-Time Analytics: Druid, ClickHouse, Materialized Views for instant insights.


10. API Design & Best Practices

    33. Designing scalable, secure, and easy to maintain APIs

  • RESTful API

    • Nouns in URLs/users/{id} instead of /getUser.
    • Versioning → /api/v1/users or Accept: version=1.0.
    • Follow Proper HTTP MethodsGET, POST, PUT, PATCH, DELETE.
    • Use Query Parameters for Filtering, Sorting & Pagination → 
      • /products?category=electronics&sort=price_desc&page=1&limit=10
    • Meaningful Status Codes200 OK, 201 Created, 400 Bad Request, 404 Not Found.
    • Consistent JSON Responses{ "status": "success", "data": {...} }.
    • Graceful Error Handling{ "error": "Invalid email format", "code": 400 }.
    • Caching → Use ETag, Redis, or a CDN.
    • Secure API → Use HTTPSOAuth 2.0JWT, rate limiting, and input validation.
    • Logging & Monitoring → Use structured logs and tools like Datadog, Prometheus.
    • Implement HATEOAS (Hypermedia as the Engine of Application State).
    • Pagination for large datasets (limit & offset).
  • GraphQL for Flexible Queries

    • Use GraphQL Federation for distributed microservices.
    • Avoid N+1 query problem using DataLoader.
  • gRPC for Low-Latency Communication

    • Use Protobuf for compact payloads.
    • Implement bidirectional streaming.


11. Data Consistency & Concurrency Handling

    34. Ensuring Data Consistency in Distributed Systems

  • CAP Theorem Considerations

    • Consistency (C) → Use strong consistency (Zookeeper, Spanner).
    • Availability (A) → Eventual consistency (Cassandra, DynamoDB).
    • Partition Tolerance (P) → Necessary for distributed systems.
  • Concurrency Control Techniques

    • Optimistic Locking (ETag-based versioning).
    • Pessimistic Locking (Row-Level Locks in SQL).
    • Compare-And-Swap (CAS) for atomic updates.
  • Distributed Transactions

    • SAGA Pattern for microservices.
    • Outbox Pattern to ensure consistency between services.


12. Cost Optimization Strategies

    35Reducing Infrastructure Costs Without Compromising Performance

    • Serverless Computing → AWS Lambda, Google Cloud Functions for on-demand execution.
    • Spot & Reserved Instances → Use EC2 Spot Instances for batch processing, Reserved Instances for long-term cost savings.
    • Right-Sizing & Auto-Scaling → Optimize instance sizes and enable auto-scaling.
    • Data Storage Cost Optimization
      • Tiered Storage → Store cold data in S3 Glacier.
      • Deduplication & Compression → Use Zstandard, Snappy, LZ4 for data compression.


13. Edge Computing & IoT Architectures

    36. Handling Real-Time Processing at the Edge

    • Edge AI/ML → TensorFlow Lite, AWS Greengrass for on-device AI processing.
    • Data Processing at the Edge → AWS IoT Core, Azure IoT Edge for reducing cloud dependency.
    • Streaming Data from IoT Devices → MQTT, CoAP, Kafka for low-latency messaging.

   37. AI/ML Infrastructure

    • MLOps & Model Deployment: TensorFlow Serving, MLflow, Kubeflow
    • Feature Stores: Feast, AWS SageMaker Feature Store
    • AI-Powered Anomaly Detection for system logs & security


14. Multi-Tenancy & SaaS Architectures

   38. Building scalable, multi-tenant applications.

    • Database Strategies:
      • Shared DB, Shared Schema → Cost-efficient but requires strong tenant isolation.
      • Shared DB, Separate Schemas → Better isolation but more overhead.
      • Separate DBs per Tenant → Strongest isolation but complex management.
    • Tenant Isolation: Row-Level Security (RLS), API Gateway-based rate limiting.
    • Scaling Tenants: Kubernetes HPA, Auto-scaling groups, Load balancing.

System Design - Golden Rules

1. If we are dealing with a read-heavy system, it's good to consider using a Cache to store frequently accessed data in memory, reducing database load and improving response times. Examples include Redis or Memcached.

2. If we need low latency in the system, it's good to consider using a Cache for dynamic data and a CDN for static assets like images, CSS, and JavaScript, to serve content closer to the end-user.

3. If we are dealing with a write-heavy system, it's good to use a Message Queue (e.g., RabbitMQ, Kafka, or SQS) for asynchronous processing and to decouple components for better scalability.

4. If we need a system to be ACID-compliant, we should go for an RDBMS (e.g., MySQL, PostgreSQL, or Oracle Database) to ensure transactional integrity and data consistency.

5. If data is unstructured & doesn't require ACID properties, we should go for a NoSQL Database like MongoDB, Cassandra, or DynamoDB, which provide flexible schemas and high scalability.

6. If the system has complex data in the form of videos, images, files, etc., we should go for Blob/Object storage solutions like Amazon S3, Azure Blob Storage, or Google Cloud Storage.

7. If the system requires complex pre-computation (e.g., a news feed or recommendations), we should use a combination of Message Queues for asynchronous task management and Cache for storing precomputed results.

8. If the system requires searching data in high volume, we should consider using a search index or a search engine like Elasticsearch, Apache Solr, or Algolia for full-text search and analytics.

9. If the system requires to scale SQL Database, we should consider using Database Sharding, Partitioning, or Replication to distribute data and workload effectively.

10. If the system requires High Availability, Performance, & Throughput, we should consider using a Load Balancer to distribute traffic across servers and ensure failover.

11. If the system requires faster data delivery globally, reliability, high availability, and performance, we should consider using a CDN like Cloudflare, Akamai, or AWS CloudFront.

12. If the system has data with nodes, edges, and relationships like social graphs, road networks, or recommendation engines, we should consider using a Graph Database like Neo4j or ArangoDB.

13. If the system needs scaling of various components, like servers, databases, etc., we should consider Horizontal Scaling, which adds more machines to the system rather than scaling vertically.

14. If the system requires high-performing database queries, we should use Database Indexes to improve the efficiency of SELECT statements and reduce query latency.

15. If the system requires bulk job processing, we should consider using Batch Processing frameworks like Apache Hadoop or Spark, combined with Message Queues for task distribution.

16. If the system requires reducing server load and preventing DOS attacks, we should implement a Rate Limiter using tools like NGINX, HAProxy, or libraries like Guava RateLimiter.

17. If the system has microservices, we should consider using an API Gateway for features like Authentication, SSL Termination, Routing, and Rate Limiting.

18. If the system has a single point of failure, we should implement Redundancy (e.g., multiple instances or servers) in that component to improve resilience.

19. If the system needs to be fault-tolerant and durable, we should implement Data Replication, creating multiple copies of data on different servers or regions for backup and recovery.

20. If the system needs user-to-user communication (bi-directional) in a fast way, we should use WebSockets for real-time communication.

21. If the system needs the ability to detect failures in a distributed system, we should implement a Heartbeat mechanism to monitor the health of nodes.

22. If the system needs to ensure data integrity, we should use a Checksum Algorithm like MD5 or SHA to verify the correctness of data during transmission or storage.

23. If the system needs to transfer data between servers in a decentralized way, we should use the Gossip Protocol for efficient information dissemination in distributed networks.

24. If the system needs to scale servers with the addition or removal of nodes efficiently, with no hotspots, we should implement Consistent Hashing.

25. If the system deals with location-based data, such as maps or nearby resources, we should use data structures like Quadtrees or Geohash for spatial indexing and efficient querying.

26. If the system needs event-driven architecture, consider using Event Streaming platforms like Apache Kafka or Amazon Kinesis to handle real-time data pipelines.

27. If the system requires high throughput with fault-tolerant workflows, we should consider using a Workflow Orchestration Tool like Apache Airflow or Temporal.

28. If the system involves analytics or monitoring large-scale data, we should use OLAP systems or tools like Apache Druid or ClickHouse.

29. If the system needs to ensure eventual consistency in a distributed setup, consider using Eventual Consistency Models with tools like DynamoDB or Cassandra.

30. If the system handles sensitive information, implement Encryption (both at rest and in transit) and enforce strict Access Controls.

31. If the system needs to handle unpredictable workloads, consider Auto-Scaling mechanisms to dynamically adjust resources based on demand.

Copilot

GitHub Copilot is an AI-powered code completion tool developed by GitHub in collaboration with OpenAI. It helps developers by suggesting code snippets, entire functions, and even generating documentation as they type, improving coding efficiency. Here's how it works and what it offers:

Key Features
  1. Code Suggestions

    • GitHub Copilot can suggest entire lines or blocks of code based on the context of your current coding task.
    • It learns from the code you write and adjusts its suggestions accordingly.
  2. Supports Multiple Languages

    • Copilot supports a wide range of programming languages including Python, JavaScript, TypeScript, Ruby, Go, Java, C#, and more.
    • It works across multiple frameworks and libraries.
  3. Contextual Awareness

    • It understands comments and context within the code. If you describe a function in a comment, Copilot can generate a full implementation.
    • It’s capable of interpreting comments, variables, and even importing necessary modules automatically.
  4. Integrated in Development Environments

    • GitHub Copilot is available as an extension for Visual Studio Code (VS Code), making it easy to integrate into your existing workflow.
    • It also works in other IDEs like JetBrains.
  5. Learning from Open Source Code

    • Copilot is trained on a vast amount of publicly available open-source code, helping it suggest relevant code patterns and solutions.
  6. Limitations

    • It doesn’t always generate perfect code, and in some cases, suggestions might need refinement.
    • It can sometimes suggest code snippets that may have security vulnerabilities or outdated patterns, so developers need to verify the suggestions.
    • Copilot doesn't have awareness of private code unless specifically trained or given access to it, so it’s privacy-conscious.
  7. Ethical Considerations

    • Since Copilot is trained on public repositories, some concerns have been raised about licensing, particularly whether the code snippets it generates might unintentionally include license-protected code.

How to Use GitHub Copilot

  1. Installation

    • You can install GitHub Copilot as an extension in Visual Studio Code by searching for "GitHub Copilot" in the Extensions marketplace.
  2. Subscription

    • As of 2023, GitHub Copilot requires a subscription, though it provides a free trial for users to test its features.
  3. Workflow

    • After installation, as you code in supported languages, Copilot will start suggesting code in real-time.
    • You can accept suggestions by pressing Tab, or cycle through multiple suggestions with keyboard shortcuts.

Example: Setting up and using "GitHub Copilot" and "GitHub Copilot Chat" extentions in VS Code.

Step1: Install the GitHub Copilot Extension
  • Open VS Code.
  • Go to the Extensions panel (on the sidebar or Ctrl+Shift+X).
  • Search for "GitHub Copilot" and click Install.
  • Search for "GitHub Copilot Chat" and click Install.
Step2: Sign in to GitHub
  • After installing the extension, you'll be prompted to sign in to your GitHub account.
  • Make sure your account has access to GitHub Copilot (it requires a paid subscription or a free trial).
Step3: Start coding
  • Create a new file with an appropriate file extension (e.g. .js, .py, .java). 
Please note while using first time, It will suggest you to install few essential plugins based on file you create (e.g. .java), which you should install.


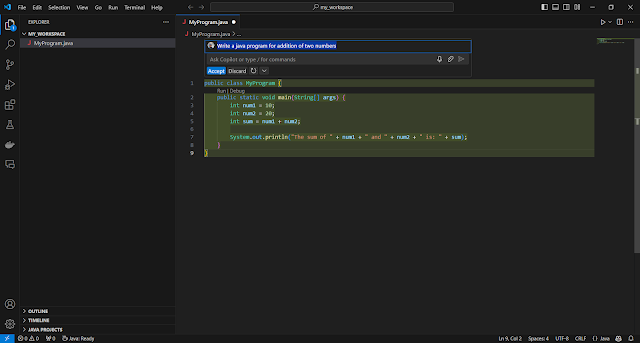
You can type or ask by pressing CTRL+I and Copilot will generate code for your problem statement. 


Copilot will start suggesting code, as you type. You can accept suggestions by pressing Tab key.


Copilot also suggest code for a comment. Just write a comment on a class and when you move curser inside class you will be suggested with a few codes where you can accept one.


You can get explanation of your code, press CTRL+I and type /explain and enter


👉 Similarly you can generate /doc/tests, and also /fix the code by pressing CTRL+I and providing these paths.


GitHub Copilot Chat

👉 Open "GitHub Copilot Chat" window to chat with GitHub Copilot (an OpenAI LLM Codex)

Click on GitHub Copilot icon which is at right button in IDE -> show Copilot status menu -> GitHub Copilot Chat -> than start chatting

👉 Explain the code: Select the code and type /explain in Copilot Chat 


👉 Debug the exception: Copy your exception from the console and paste in Copilot Chat.

👉 Fix the code: Open the code to fix and type /fix in Copilot Chat 

👉 Generate unit tests: Select the method and type /tests in Copilot Chat.

👉 Get documentation: Select the code and type /doc in Copilot Chat.

👉 Review and refactor: Select the code and type like review and refactor in Copilot Chat.

👉 You can generate anything like exception handling class, etc for a specific code in Copilot Chat.


GitHub Copilot vs GitHub Copilot Chat

  • Copilot provides real-time code suggestions to speed up your workflow, while Copilot Chat offers deeper interactions like answering specific questions, helping with debugging, and explaining code when needed.
  • You can think of Copilot as a passive code-writing assistant and Copilot Chat as a more active, conversational partner.

Kafka

 Apache Kafka is a distributed streaming platform that is used for building real-time data pipelines and streaming applications. It is designed to handle high-throughput, fault-tolerant, and scalable messaging systems. It was originally developed at LinkedIn and later open-sourced through the Apache Software Foundation. Kafka is primarily used for three key functions:

  1. Publish and Subscribe: Kafka allows applications to publish and subscribe to streams of records, which makes it similar to a message queue or enterprise messaging system.

  2. Store Streams of Data: Kafka can store streams of records in a fault-tolerant, durable manner. The stored data can be persisted for a defined period, making it suitable for applications that need to process and analyze historical data as well as live data.

  3. Process Streams: Kafka allows applications to process streams of data in real-time as they are produced. This is useful for real-time analytics, monitoring systems, and event-driven architectures.


Key Definitions
  • Producers: Producers are applications that write data (records) to Kafka topics.

  • Consumers: Consumers are applications that read data from topics.

  • Topic: A topic is a category or feed name to which records are published. Each record in Kafka belongs to a topic.

  • Partition: A subdivision of a topic. Each partition is an ordered, immutable sequence of messages, which allows Kafka to scale horizontally.

  • Broker: A Kafka server that stores messages in topics and serves client requests. A Kafka cluster consists of multiple brokers.

  • Replication: The process of copying data across multiple brokers to ensure durability and availability. Each partition can have multiple replicas.

  • Leader and Follower: In a replicated partition, one broker acts as the leader (handling all reads and writes), while the others are followers (replicating data from the leader).

  • Offset: A unique identifier for each message within a partition, allowing consumers to track their progress.

  • Consumer Lag: The difference between the latest message offset in a topic and the offset of the last message processed by a consumer. It indicates how far a consumer is behind.

  • Schema Registry: A service for managing schemas used in Kafka messages, ensuring that producers and consumers agree on data formats. It supports Avro, Protobuf, and JSON formats and ensures that schema evolution is handled safely (e.g., forward and backward compatibility).

  • Kafka Connect: A framework for integrating Kafka with external systems (databases, file systems, cloud services, etc.). Kafka Connect provides source connectors (to pull data into Kafka) and sink connectors (to push data out of Kafka).

  • Kafka Streams: A client library for building real-time applications that process data stored in Kafka, allowing for transformations, aggregations, and more.

  • Topic Retention: The policy that dictates how long messages are kept in a topic. This can be based on time (e.g., retain messages for 7 days) or size (e.g., retain up to 1 GB of messages).

  • Transactional Messaging: A feature that allows for exactly-once processing semantics, enabling producers to send messages to multiple partitions atomically.

  • Log Compaction: A process that reduces the storage footprint of a topic by retaining only the most recent message for each key, useful for maintaining a state snapshot.

  • KSQL: KSQL is a SQL-like streaming engine for Apache Kafka, which allows you to query, manipulate, and aggregate data in Kafka topics using SQL commands.

  • Zookeeper: While not directly part of Kafka's core functionality, Zookeeper is used for managing cluster metadata, broker coordination, and leader election. Note that newer versions are moving towards removing Zookeeper dependency. 


Features
  • Durability: Kafka guarantees durability by writing data to disk and replicating it across multiple brokers. Even if some brokers fail, the data remains safe.

  • High Throughput: Kafka can handle a high volume of data with low latency. It achieves this by batching messages, storing them efficiently, and leveraging a zero-copy optimization in modern operating systems.

  • Fault Tolerance: Kafka replicates data across brokers, ensuring that if one broker fails, the data can still be read from another broker that holds the replica.

  • Scalability: Kafka’s partition-based architecture allows horizontal scaling. You can add more brokers to the cluster, and Kafka will redistribute data to ensure balance.

  • Retention: Kafka allows for configuring the retention policy of messages. You can store messages indefinitely or delete them after a certain period or when the log reaches a specific size. This makes Kafka flexible for different use cases, whether you need short-term processing or long-term storage.


Use Cases
  • Real-Time Analytics: Kafka is widely used in big data environments where companies want to process massive streams of events in real time. For example, LinkedIn uses Kafka for tracking activity data and operational metrics, feeding into both batch and stream processing systems.
  • Log Aggregation: Kafka can aggregate logs from multiple services or applications, making it easier to analyze them or store them for future reference. This is useful for monitoring, diagnostics, and troubleshooting.
  • Event Sourcing: Kafka is often used in event-driven architectures, where systems communicate by publishing events to Kafka topics. Consumers can process these events in real-time or later, enabling systems to handle complex workflows and state changes.
  • Messaging System: Kafka can replace traditional message brokers like RabbitMQ or ActiveMQ, especially when dealing with high-throughput messaging needs.
  • Data Pipelines: Kafka serves as a backbone for large-scale data pipelines, allowing the integration of data across multiple systems, such as databases, analytics platforms, and machine learning systems.
Companies Using Kafka
  • LinkedIn (where Kafka was originally developed)
  • Netflix (for real-time monitoring and analytics)
  • Uber (for geospatial tracking and event-based communication)
  • Airbnb (for real-time data flow management)
  • Twitter (for its log aggregation and stream processing systems)
Kafka's ability to handle large volumes of real-time data efficiently, with fault tolerance and scalability, makes it a vital tool for modern data-driven architectures.

Documentation: An official (great) documentation on Kafka can be found with following URL. You can find everything like definitions, setup, commands and all.


Example 1: A basic example on Kafka
- Setup apache kafka server on a VM. Use two terminals and consider one for producer and another for consumer. Producer will produce a message to the topic and consumer will read it from the topic.

Prerequisites
  • Java: Kafka runs on JVM, so ensure that Java is installed.
  • Zookeeper: Kafka uses Zookeeper to manage brokers, topics, and other cluster-related metadata. Zookeeper comes bundled with Kafka.
Step 1: Install Java. Kafka requires Java 8 or higher
sudo apt update
sudo apt install openjdk-17-jdk -y
java -version

Step 2: Download Kafka
wget https://downloads.apache.org/kafka/3.8.0/kafka_2.12-3.8.0.tgz

tar -xzf kafka_2.12-3.8.0.tgz
cd kafka_2.12-3.8.0

Step 3: Start Zookeeper
- Kafka requires Zookeeper to run, so you must first start a Zookeeper instance. Zookeeper comes bundled with Kafka, so you can use the default Zookeeper configuration.

bin/zookeeper-server-start.sh config/zookeeper.properties


Step 4: Start Kafka Broker
Once Zookeeper is running, you can start the Kafka broker. Open another terminal and run

bin/kafka-server-start.sh config/server.properties


Step 5: Create a topic
- Kafka organizes messages into topics. You can create a new topic

bin/kafka-topics.sh --create --topic my-topic --bootstrap-server localhost:9092 --partitions 1 --replication-factor 1

- You can verify the created topic
bin/kafka-topics.sh --list --bootstrap-server localhost:9092


Step 6: Produce a message to the topic

bin/kafka-console-producer.sh --topic my-topic --bootstrap-server localhost:9092

Type a message and press Enter.


Step 7: Consume a message from the topic
- Open another terminal and run

bin/kafka-console-consumer.sh --topic my-topic --from-beginning --bootstrap-server localhost:9092


Step 8: Managing Kafka
To scale your setup or add brokers, you'll need to configure more brokers and manage them via Zookeeper. Kafka supports various configurations for high availability, replication, and partitioning.

Additional Steps:
  • Configure Kafka for production: You’ll need to modify the server.properties file (e.g. set broker ID, configure log retention, optimize replication, etc.).
  • Monitoring and logging: Set up metrics and logging tools like Prometheus, Grafana, or Kafka’s own JMX monitoring.


Example 2: Integrate Apache Kafka with a Spring Boot application.

Step 1: Setup Spring Boot Project
You can create a Spring Boot application using Spring Initializr (https://start.spring.io/). Include the following dependencies:
  • Spring Web
  • Spring for Apache Kafka

Step 2: Add Kafka configuration in application.properties

#65.0.215.170 is IP of kafka server
spring.kafka.bootstrap-servers=65.0.215.170:9092
spring.kafka.consumer.group-id=my-group
spring.kafka.consumer.auto-offset-reset=earliest

Step 3: Create a Kafka Producer
- A service that will send messages to a Kafka topic.

import org.springframework.beans.factory.annotation.Autowired;
import org.springframework.kafka.core.KafkaTemplate;
import org.springframework.stereotype.Service;

@Service
public class KafkaProducer {

    private final KafkaTemplate<String, String> kafkaTemplate;

    @Autowired
    public KafkaProducer(KafkaTemplate<String, String> kafkaTemplate) {
        this.kafkaTemplate = kafkaTemplate;
    }

    public void sendMessage(String topic, String message) {
        kafkaTemplate.send(topic, message);
    }
}

Step 4: Create a Kafka Consumer
- A listener that will consume messages from a Kafka topic.
- Assuming we already created a topic name my-topic in Kafka.

import org.springframework.kafka.annotation.KafkaListener;
import org.springframework.stereotype.Service;

@Service
public class KafkaConsumer {

    @KafkaListener(topics = "my-topic", groupId = "my-group")
    public void listen(String message) {
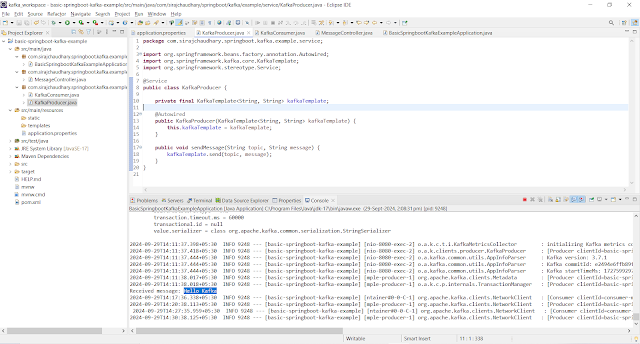
        System.out.println("Received message: " + message);
    }
}


Step 5: Create a controller to test the Producer

import org.springframework.beans.factory.annotation.Autowired;
import org.springframework.web.bind.annotation.GetMapping;
import org.springframework.web.bind.annotation.RequestParam;
import org.springframework.web.bind.annotation.RestController;

@RestController
public class MessageController {

    private final KafkaProducer kafkaProducer;

    @Autowired
    public MessageController(KafkaProducer kafkaProducer) {
        this.kafkaProducer = kafkaProducer;
    }

    @GetMapping("/send")
    public String sendMessage(@RequestParam String message) {
        kafkaProducer.sendMessage("my-topic", message);
        return "Message sent: " + message;
    }
}


Step 6: Run Zookeeper, Kafka and the Spring Boot Application

Step 7: Test the application


Vagrant

Vagrant is an open-source tool used for managing virtualized development environments. It simplifies the process of setting up, configuring, and managing virtual machines (VMs) by providing a consistent, repeatable, and portable environment.

Here’s how Vagrant works and some of its key features:

Key Concepts:

  • Vagrantfile: At the heart of a Vagrant environment is the Vagrantfile, a configuration file written in Ruby that defines the properties of the virtual machine (VM). It specifies things like the base image (called a "box"), networking, and other settings.

  • Boxes: These are pre-configured base images for virtual machines. Vagrant uses these to quickly set up environments. You can find boxes for different operating systems or configurations on Vagrant Cloud.

  • Providers: Vagrant uses "providers" to manage the virtual machines. The most common provider is VirtualBox, but Vagrant also supports other providers like VMware, Hyper-V, and Docker.

  • Provisioners: Vagrant can use "provisioners" like shell scripts, Chef, Puppet, and Ansible to automatically configure the machine after it has been booted.

Workflow:

  1. Initialize a Project: You start by creating a Vagrantfile with vagrant init, which generates a basic configuration file.

  2. Up: The vagrant up command brings up the VM. Vagrant checks the Vagrantfile for configuration settings, fetches the necessary box, and boots up the virtual machine.

  3. SSH Access: Once the VM is running, you can use vagrant ssh to SSH into the machine and work within that environment.

  4. Provisioning: If you have defined any provisioning scripts, they will run during the vagrant up process, or you can manually trigger them with vagrant provision.

  5. Suspend/Destroy: You can suspend the machine (vagrant suspend) to save its state or destroy it entirely (vagrant destroy) when you no longer need it.

Benefits:

  • Consistency: All developers on a project can share the same development environment, avoiding the "it works on my machine" problem.

  • Automation: Vagrant automates the setup and provisioning of environments, saving time and reducing manual setup errors.

  • Portability: A Vagrant environment can be easily shared with others, allowing the same environment to be used across different systems.


Example: Set up multiple VMs using Vagrant.
- Set up two (ubuntu) VMs in a private network and also install java11, maven, git in each VM using Vagrant.
- Using this setup two developers (two VMs) on a project share the same development environment, avoiding the "it works on my machine" problem.

Step 1: Install Vagrant and VirtualBox (or any other provider)

Step 2: Create a directory where your Vagrant configuration will reside

mkdir multi-vm-setup
cd multi-vm-setup

Step 3: Initialize Vagrant

vagrant init

It will create a basic Vagrantfile

Step 4: Modify the Vagrantfile to define multiple virtual machines

Vagrant.configure("2") do |config|
  # Define the first VM: Virtual Machine 1
  config.vm.define "vm1" do |vm1|
    vm1.vm.box = "ubuntu/bionic64"    # Base box for the vm1
    vm1.vm.hostname = "virtual-machine-1"    # Hostname
    vm1.vm.network "private_network", type: "dhcp" # Private network with DHCP
    vm1.vm.provider "virtualbox" do |vb|
      vb.memory = "1024"              # Allocate 1GB memory
    end
    
    # Install OpenJDK, Maven, and Git with a shell script in VM
    vm1.vm.provision "shell", inline: <<-SHELL
      sudo apt-get update
      # Install OpenJDK
      sudo apt-get install -y openjdk-11-jdk
      # Install Maven
      sudo apt-get install -y maven
      # Install Git
      sudo apt-get install -y git
    SHELL
  end
  
  # Define the first VM: Virtual Machine 2
  config.vm.define "vm2" do |vm2|
    vm2.vm.box = "ubuntu/bionic64"    # Base box for the vm2
    vm2.vm.hostname = "virtual-machine-2"    # Hostname
    vm2.vm.network "private_network", type: "dhcp" # Private network with DHCP
    vm2.vm.provider "virtualbox" do |vb|
      vb.memory = "1024"              # Allocate 1GB memory
    end
    
    # Install OpenJDK, Maven, and Git with a shell script in VM
    vm2.vm.provision "shell", inline: <<-SHELL
      sudo apt-get update
      # Install OpenJDK
      sudo apt-get install -y openjdk-11-jdk
      # Install Maven
      sudo apt-get install -y maven
      # Install Git
      sudo apt-get install -y git
    SHELL
  end

end 

Breakdown

  • config.vm.define "vm1" do |vm1|: Defines the VM with a box (ubuntu/bionic64), sets the hostname, and configures network settings.
  • vm1.vm.provider "virtualbox": Allocates memory for each VM.
  • You can add more VMs by repeating the config.vm.define block for additional machines.
  • Each VM is connected to the same private network via DHCP.

Step 5: Start all VMs

vagrant up

Step 6: Interact with a specific VM

vagrant ssh vm1   # Access the virtual machine 1
vagrant ssh vm2   # Access the virtual machine 2

Now, you’re inside the virtual machines and can start working in the development environment.

Step 7: Shut down all VMs

vagrant halt

Step 8: Destroy all VMs (if you want to remove them)

vagrant destroy


👉 I would prefer using any configuration management tool like Ansible (rather using Vagrant) to setup same development environments (e.g. same JDK version, Maven version etc) on multi VMs for the team.