Jenkins

Jenkins is an open-source automation server used primarily for continuous integration (CI) and continuous delivery (CD) in software development. It automates tasks related to building, testing, and deploying code, making it easier for teams to work together on software projects.

Jenkins is widely used in DevOps and software development workflows to speed up delivery cycles, ensure quality through automation, and reduce the need for manual intervention in repetitive tasks.

Key Features

  • Extensibility: Jenkins supports a vast array of plugins that allow for integration with various tools, including Git, Docker, and Kubernetes.
  • Distributed Builds: Jenkins can distribute workloads across multiple machines to speed up the CI/CD process.
  • Pipeline as Code: Jenkins provides a way to define CI/CD pipelines as code using Groovy-based DSL (Domain Specific Language), allowing for complex workflows.
  • Community and Plugins: Being open-source, Jenkins has a large and active community. Its plugin ecosystem allows for integration with various development, deployment, and operations tools.

Typical Use Cases

  • Build Automation: Automatically building code upon each commit.
  • Testing Automation: Running automated tests to ensure code quality.
  • Deployment Automation: Automating the process of deploying code to production or other environments.


👉 Setup Jenkins Server (step-by-step guide)

Step1: Install Java
  • Jenkins requires Java to run. First, install Java on your system.
sudo apt update -y
sudo apt upgrade -y

sudo apt install openjdk-17-jdk -y
java -version

  • Add the Jenkins repository and key
sudo wget -O /usr/share/keyrings/jenkins-keyring.asc \
  https://pkg.jenkins.io/debian-stable/jenkins.io-2023.key
  
echo "deb [signed-by=/usr/share/keyrings/jenkins-keyring.asc]" \
  https://pkg.jenkins.io/debian-stable binary/ | sudo tee \
  /etc/apt/sources.list.d/jenkins.list > /dev/null
  • Install Jenkins
sudo apt-get update -y
sudo apt-get install jenkins

Step3: Start Jenkins (You can start/stop Jenkins service with systemctl commands)
  • Starts the Jenkins service
sudo systemctl start jenkins

  • Enable Jenkins service to start automatically when the system reboot (so always enable Jenkins service after start)

sudo systemctl enable jenkins

Disable Jenkins service from starting automatically when the system reboot but does not stop it if already running 

sudo systemctl disable jenkins
  • Check the status of Jenkins service
sudo systemctl status jenkins
  • Stop Jenkins service if already running but does not prevent it from starting on reboot
sudo systemctl stop jenkins

Step4: Access Jenkins
  • Open your web browser and go to http://your_server_ip_or_domain:8080
  • Unlock Jenkins: Jenkins will ask for an initial password. You can retrieve it using
sudo cat /var/lib/jenkins/secrets/initialAdminPassword
  • Complete the setup wizard
    1. Install suggested plugins or select plugins manually
    2. Create your first admin user account

Step5: Configure Jenkins
Once Jenkins is up and running
  1. Configure Jenkins Global Settings: Go to Manage Jenkins > Configure System to configure system-wide settings.
  2. Set up Jenkins Nodes (Optional): If you need to configure distributed builds, go to Manage Jenkins > Manage Nodes and Clouds.
Step6: Install Plugins
Jenkins supports many plugins to extend its functionality. To install plugins,
  1. Go to Manage Jenkins > Manage Plugins.
  2. Install the required plugins (e.g., Git, Docker, Maven, etc.)


👉 Jenkins Jobs : A Jenkins job refers to a task or project that Jenkins executes to automate different aspects of software development, such as building, testing, and deploying applications.

Types of Jenkins Jobs
  • Freestyle Job:
    • The most basic type of Jenkins job.
    • Allows you to define a set of steps like shell scripts, build triggers, and post-build actions.
    • Useful for simple tasks or when flexibility is needed in defining custom build processes.
  • Pipeline Job:
    • Defines a set of tasks (or stages) that are executed in a sequence using Groovy scripts.
    • Supports both Declarative Pipelines (easier to read and maintain) and Scripted Pipelines (more flexibility for complex logic).
    • Can manage complex workflows with multiple steps, parallel processing, and integration with source control.
  • Multibranch Pipeline Job:
    • Automates the creation of pipeline jobs for branches in a source control repository.
    • Automatically discovers new branches in a repository and runs pipeline jobs on them, making it easier to handle multiple branches in a project.
  • Folder Job:
    • Organizes multiple jobs into folders.
    • Useful for managing large-scale Jenkins environments with many jobs by grouping related jobs together.
  • GitHub Organization Job:
    • Automatically sets up Jenkins jobs for every repository in a GitHub organization.
    • Jenkins will discover and create jobs for repositories and branches that contain Jenkinsfile.
  • Matrix (Multi-configuration) Job:
    • Designed for testing across multiple environments or configurations.
    • You can specify parameters (e.g., different OSes, browser types), and Jenkins will run the job with each combination.
Key Concepts in Jenkins Jobs
  • Build Triggers: Define when the job should be run, such as after a code commit, at scheduled intervals, or when another job finishes.
  • Build Steps: The individual tasks or commands executed during the job, such as compiling code, running tests, or deploying the software.
  • Post-build Actions: Actions taken after the job completes, such as sending notifications, archiving artifacts, or triggering other jobs.
Managing Jenkins Jobs
  • Jobs can be created manually via the Jenkins UI or automatically using Jenkinsfiles.
  • Jenkinsfile: A file that defines the job's pipeline in code, allowing for version control and easy collaboration.
Jenkins Jobs Advanced Features
  • Parameters:
    • Jenkins jobs can be parameterized, meaning they can accept inputs when the job is triggered (e.g., environment, branch name, or user-specified values).
    • Common parameters include string, boolean, choice, or file parameters.
    • Useful for reusing the same job across different environments or configurations.
  • Triggers and Scheduling:
    • Jobs can be triggered by:
      • SCM changes: Automatically runs when changes are committed to a source control repository (e.g., Git, Subversion).
      • Polling SCM: Jenkins periodically checks the repository for changes and triggers a job if there are updates.
      • Build after other jobs are completed: You can chain jobs together so that one job starts after another finishes.
      • Scheduled Jobs: Using CRON syntax, Jenkins jobs can run at regular intervals (e.g., nightly builds or weekly tests).
  • Build Agents (Nodes):
    • Jenkins can distribute jobs across multiple agents (nodes) to balance the load or run jobs on specific machines/environments.
    • Master is the central node where Jenkins is installed, and agents are additional machines where jobs can be run.
    • You can define labels for nodes and assign jobs to specific labels to ensure they run in the correct environment.
  • Post-Build Actions:
    • After a job is completed, Jenkins allows you to define actions based on the result of the job (success, failure, or unstable build):
      • Publish JUnit test results: Jenkins can display test results and trends over time.
      • Archive artifacts: Store important files (e.g., build outputs, logs) from a job's execution.
      • Send notifications: Jenkins can notify team members via email, Slack, or other messaging platforms about the status of a job.
      • Deploy: Automatically deploy an application to a production or testing environment.
  • Build History and Console Output:
    • Jenkins maintains a history of all job runs, providing logs for each build.
    • You can inspect the console output of each run to view logs, errors, or any information printed during the build steps.
    • Build history helps in debugging issues by allowing you to compare successful and failed runs.
  • Integrations:
    • Jenkins integrates with many tools and services via plugins, including:
      • Version control systems (Git, GitHub, Bitbucket, SVN)
      • Testing frameworks (JUnit, TestNG, Selenium)
      • CI/CD tools (Docker, Kubernetes)
      • Notification services (Slack, Email)
      • Cloud providers (AWS, Azure, Google Cloud)
    • Jenkins has a vast ecosystem of plugins to extend its functionality.
  • Blue Ocean:
    • Jenkins offers a modern user interface called Blue Ocean that provides a more user-friendly way to visualize and manage pipelines.
    • It displays a graphical representation of jobs and pipelines, showing which stages passed or failed.
  • Declarative vs Scripted Pipelines:
    • Declarative Pipelines are simpler and use a structured syntax that makes it easier for users to define pipeline jobs in a human-readable format.
    • Scripted Pipelines provide more flexibility and are written in a full-fledged Groovy script. These are useful for more complex automation scenarios.


👉 Example 1: Create a Jenkins Freestyle Job that builds a Java (Maven) Project
- You will be able to run this job in two ways, either manually by clicking "Build Now" button on Jenkins UI or it will be triggered automatically on pushing a updated code into GitHub repository.

Step 1: Configure webhook in project GitHub repository
Under project GitHub repository -> Settings -> Webhooks -> Payload URL http://<Jenkins-Server-IP>:8080/github-webhook/ -> content type application/json -> Add webhook


Step 2: Create a New Freestyle Project
  • Open Jenkins.
  • Click on "New Item."
  • Give the job a name (e.g., Build_MyApp) and select "Freestyle Project."
  • Click "OK."
Step 3: Configure Source Code Management (SCM)
  • Under "Source Code Management," select "Git."
  • Enter the GitHub repository URL https://github.com/SirajChaudhary/springboot-helloworld-service.git
  • If its private github repository, provide credentials for accessing the repository.

Step 4: Configure Build Trigger
  • Scroll down to the "Build Trigger" section.
  • Select "GitHub hook trigger for GITScm polling"

Step 5: Configure the Build Steps
  • Scroll down to the "Build Steps" section.
  • Select "Add build step" → "Invoke top-level Maven targets."
  • In the "Goals" field, enter clean install to clean the existing build and compile the project.

Step 6: Post-Build Actions
  • Scroll down to the "Post-build Actions" section.
  • Add an action like "Archive the artifacts" if you want to save build artifacts (e.g., target/*.jar files).
  • Optionally, you can configure email notifications to notify users about the build status.
Step 7: Save and Build the Job
  • Click "Save" to store the job configuration.
  • You can now either trigger the job manually by clicking "Build Now" or set up automatic triggers like:
    • Click "Build Now" or
    • Change and push the code in the GitHub repository to trigger Jenkins job automatically
Step 8: Monitor the Build
  • After triggering the build, Jenkins will display a build progress bar.
  • You can monitor the console output in real-time to see the build process, including Maven compiling your Java code, running tests, and packaging the output (usually a .jar or .war file).


👉 Example 2: Create a Jenkins Pipeline Job to automate the process of building, testing, deploying, and running a Spring Boot application on a remote machine.

-For this example we consider having two machines (EC2 instances). One for Jenkins and another for project deployment and let's call them as Jenkins Server and Remote Server respectively.

Step 1: Configure webhook in project GitHub repository
Under project GitHub repository -> Settings -> Webhooks -> Payload URL http://<Jenkins-Server-IP>:8080/github-webhook/ -> content type application/json -> Add webhook

Step 2: Install JDK and Maven in Remote Server where spring boot application will be deployed
sudo apt update -y
sudo apt upgrade -y
sudo apt install openjdk-17-jdk -y
sudo apt install maven

Step 3: Create a new Pipeline Job (Project) in Jenkins server
  • Open Jenkins.
  • Click on "New Item."
  • Give the job a name (e.g., Build_Deploy_MyApp) and select "Pipeline"
  • Click "OK."
- Add GitHub project URL
https://github.com/SirajChaudhary/springboot-helloworld-service.git

- Configure Build Trigger
Scroll down to the "Build Trigger" section.
Select "GitHub hook trigger for GITScm polling"


Note: You need to install and configure a SSH plugin 'sshagent' which is required to deploy and run application jar to remote host. I had also installed and configure 'Publish over SSH' plugin (added .pem key in its configuration).


Step 4: Write a Jenkins Pipeline groovy script (Declarative Pipeline)
Pipeline Steps Overview
  • Checkout the Code from the repository.
  • Build the Spring Boot application using Maven/Gradle.
  • Run Tests to ensure that the application is working as expected.
  • Deploy the application to a remote machine using SSH or SCP.
  • Stop (Kill process) already running application instance (port:8080) if any
  • Run the application on the remote machine.

pipeline {
    agent any
    environment {
        REMOTE_USER = 'ubuntu'
        REMOTE_HOST = '3.109.227.52'
        REMOTE_DIR = '/home/ubuntu'
        JAR_NAME = 'springboot-helloworld-service-0.0.1-SNAPSHOT.jar'
        PORT = 8080
    }
    stages {
        stage('Checkout Code') {
            steps {
                git url: 'https://github.com/SirajChaudhary/springboot-helloworld-service.git', branch: 'main'
            }
        }
        stage('Build Application') {
            steps {
                sh 'mvn clean package'
            }
        }
        stage('Run Tests') {
            steps {
                sh 'mvn test'
            }
        }
        stage('Deploy to Remote Host') {
            steps {
                sshagent(['3.109.227.52']) {
                    // Copy the JAR file to the remote machine
                    sh """
                    
                    scp target/${JAR_NAME} ${REMOTE_USER}@${REMOTE_HOST}:${REMOTE_DIR}
                    
                    """
                }
            }
        }
        stage('Stop Running Application (Kill Process) on Remote Host') {
            steps {
                script {
                    sshagent(['3.109.227.52']) {
                        sh """
                        ssh -o StrictHostKeyChecking=no ${REMOTE_USER}@${REMOTE_HOST} '
                            PID=\$(lsof -t -i:${PORT})
                            if [ ! -z "\$PID" ]; then
                                echo "Killing process on port ${PORT} with PID \$PID"
                                kill -9 \$PID
                            else
                                echo "No process running on port ${PORT}"
                            fi'
                        """
                    }
                }
            }
        }
        stage('Run Application on Remote Host') {
            steps {
                sshagent(['3.109.227.52']) {
                    sh """
                    
                    ssh ${REMOTE_USER}@${REMOTE_HOST} 'nohup java -jar ${REMOTE_DIR}/${JAR_NAME} > /dev/null 2>&1 &'
                    
                    """
                }
            }
        }
    }
    post {
        success {
            echo 'Application deployed and running successfully!'
        }
        failure {
            echo 'Build or deployment failed.'
        }
    }
}


Note: If you notice here just below Pipleline Script editor there is link 'Pipeline Syntax' which you can use to generate your jenkins pipeline groovy scripts

Step 6: Run the Jenkins pipeline job either by clicking "Build Now" button on Jenkins UI or by pushing a new code into your GitHub repository so job will be triggered automatically. 


👉 Blue Ocean Plugin is a modern user interface for Jenkins, designed to simplify the process of continuous integration and continuous delivery (CI/CD). It provides an intuitive, visual interface compared to the more traditional Jenkins UI, making it easier to manage and monitor pipeline jobs

You can install the Blue Ocean plugin via the Jenkins Plugin Manager or by searching for it in Jenkins’ plugin repository. Once installed, it will be accessible via the Jenkins dashboard.


👉 Some more specific definitions and key concepts related to Jenkins

1. Jenkins Pipeline

  • Definition: A Jenkins Pipeline is a suite of plugins that support the implementation of continuous delivery pipelines. A pipeline defines the sequence of stages that a piece of code moves through in the CI/CD process, such as building, testing, and deploying.
  • Types:
    • Declarative Pipeline: A more structured format for defining pipelines using a Groovy-based DSL.
    • Scripted Pipeline: More flexible and powerful, but also more complex. It is written entirely in Groovy.

2. Jenkinsfile

  • Definition: A Jenkinsfile is a text file that stores the definition of a Jenkins Pipeline. It is usually placed in the root of a project’s repository and defines the entire CI/CD process in code. This allows version control of the build pipeline and promotes transparency.

3. Freestyle Project

  • Definition: A Freestyle Project in Jenkins is the simplest form of a build job, offering a flexible and easy way to automate basic tasks, such as running shell scripts or compiling code. Unlike Jenkins Pipelines, Freestyle Projects lack the robust support for complex workflows.

4. Build

  • Definition: In Jenkins, a build is the process of compiling and/or packaging software from source code. A build may also include steps like running automated tests and pushing artifacts to a repository.
  • Triggered by:
    • Source control commits (e.g., Git commits)
    • Scheduled tasks (e.g., cron jobs)
    • Manual triggers

5. Node (Agent)

  • Definition: A node (or agent) is a machine that Jenkins uses to run tasks. The main Jenkins instance is often referred to as the Master (or Controller), and it can distribute jobs to different nodes (agents) to balance the workload.

6. Master (Controller)

  • Definition: The Master (now often referred to as the Controller) is the central server in Jenkins, responsible for managing build processes, scheduling jobs, dispatching builds to agents (nodes), and handling their outputs.

7. Job

  • Definition: In Jenkins, a job is a task or unit of work that Jenkins performs. Jobs could be as simple as running a script, or as complex as running an entire CI/CD pipeline. Examples include Freestyle jobs or Pipeline jobs.

8. Executor

  • Definition: Executors are the resources that Jenkins uses to run builds. Each node has a set number of executors, which indicates how many jobs it can run simultaneously.

9. Plugin

  • Definition: Plugins are extensions for Jenkins that add new features or integrate with other tools. Jenkins has an extensive plugin ecosystem, with over a thousand plugins for SCM (Source Code Management), build tools, UI, notifications, and more.

10. Blue Ocean

  • Definition: Blue Ocean is an alternative user interface for Jenkins that provides a modern, intuitive way to visualize the pipeline process. It makes it easier to see the status of builds and the stages in a pipeline.

11. SCM (Source Code Management)

  • Definition: SCM in Jenkins refers to the source control systems (e.g., Git, SVN) that manage code. Jenkins can interact with these systems to check out code before building and testing.

12. Webhook

  • Definition: A webhook is an HTTP callback that Jenkins can use to trigger builds automatically. For example, a webhook can be set up to trigger a Jenkins build whenever new code is pushed to a repository.

13. Slave (Deprecated)

  • Definition: A term previously used for the nodes that run jobs delegated by the master. Jenkins now uses the term Agent instead of Slave.

14. Pipeline Stages

  • Definition: In a Jenkins pipeline, stages represent major steps in the process (e.g., Build, Test, Deploy). Each stage contains one or more steps that execute during the pipeline run.

15. Artifacts

  • Definition: Artifacts are files generated by a build, such as compiled code or test results. Jenkins can store and manage artifacts as part of the build history, making them available for future reference or deployment.
Here are some additional Jenkins-related definitions and key concepts

16. Build Trigger
  • Definition: A build trigger is an event or condition that automatically initiates a Jenkins job or pipeline. Triggers can be configured to run builds based on certain criteria, such as:
    • SCM polling: Jenkins checks the source control system at regular intervals to detect changes.
    • Webhook: A push-based trigger where an external system (e.g., GitHub) notifies Jenkins of changes, triggering a build.
    • Scheduled builds: Builds can be set to run at specific times, similar to cron jobs.
    • Manual trigger: A user can start the build manually through the Jenkins interface.
17. Pipeline Stages and Steps
  • Stages: These define logical segments of the pipeline, such as Build, Test, Deploy, and help organize the workflow.
  • Steps: Steps are the actual commands or functions that are executed within each stage. For example, a "Build" stage might have steps for compiling the code and running unit tests.
18. Workspace
  • Definition: A workspace is a directory on the Jenkins node where a job executes. It contains the checked-out source code and any files or data created during the build process. Each build has its own workspace, ensuring isolated environments.
19. Build Executor Status
  • Definition: Jenkins nodes have a certain number of executors, which indicate how many builds or jobs they can handle simultaneously. The build executor status shows how busy a node is and whether it has free capacity to take on new builds.
20. Declarative vs. Scripted Pipelines
  • Declarative Pipeline: A simpler and more readable way of writing Jenkins pipelines using a predefined structure. It is ideal for most use cases and enforces a cleaner syntax.
Example: groovy

pipeline {
  agent any
  stages {
    stage('Build') {
      steps {
        sh 'make build'
      }
    }
    stage('Test') {
      steps {
        sh 'make test'
      }
    }
  }
}
  • Scripted Pipeline: A fully programmable pipeline that provides more flexibility but requires a deep understanding of Groovy scripting. It’s generally more complex and is less structured compared to declarative pipelines.
21. Post Actions
  • Definition: Post actions are blocks within a Jenkins pipeline that define actions to take once the pipeline has finished executing, depending on the result of the build (e.g., success, failure, or unstable).
Example of post actions: groovy

post {
  always {
    echo 'This will always run'
  }
  success {
    echo 'This will run only if the build succeeds'
  }
  failure {
    echo 'This will run if the build fails'
  }
}

22. Environment Variables

  • Definition: Jenkins allows the use of environment variables within jobs and pipelines. These variables store dynamic data (such as build numbers, Git commit hashes, and user inputs) that can be used in various build steps.

Example: groovy

pipeline {
  environment {
    MY_VAR = 'Hello World'
  }
  stages {
    stage('Print') {
      steps {
        echo "${MY_VAR}"
      }
    }
  }
}

23. Multibranch Pipeline

  • Definition: A multibranch pipeline job is a special type of Jenkins job that automatically creates and runs pipelines for multiple branches in a repository. It dynamically discovers Jenkinsfiles in each branch and creates a job for each.
  • Use Case: Useful for repositories with many branches, as it ensures each branch has its own CI/CD pipeline.
24. Pipeline Libraries
  • Definition: Jenkins Pipeline libraries allow developers to define shared code that can be reused across multiple pipelines. These libraries are defined in a central repository, making it easier to manage common functions, steps, or configurations.
Example: You could create a shared library for common deployment steps and reuse it across various projects.

25. Parallel Execution

  • Definition: Jenkins allows stages or steps in a pipeline to be run in parallel. This is useful for speeding up the pipeline by running independent tasks simultaneously (e.g., different types of tests or builds).
Example: groovy

stage('Test') {
  parallel {
    stage('Unit Tests') {
      steps {
        sh 'make test-unit'
      }
    }
    stage('Integration Tests') {
      steps {
        sh 'make test-integration'
      }
    }
  }
}

26. Upstream and Downstream Jobs

  • Upstream Job: A job whose successful completion triggers another job. For example, a build job may trigger a downstream deployment job.
  • Downstream Job: A job that is triggered after an upstream job finishes. This can help create a chain of dependent jobs in a CI/CD pipeline.
27. Console Output
  • Definition: The console output in Jenkins provides a real-time view of what’s happening during the build process. It shows logs, outputs, errors, and any other messages generated by the steps within the pipeline or job.
28. Parameterized Build
  • Definition: A parameterized build is a Jenkins job or pipeline that takes input parameters when it's triggered. This allows users to customize the behavior of the build, such as providing different environment configurations or build options.
Example of parameterized Jenkinsfile: groovy

pipeline {
  parameters {
    string(name: 'ENV', defaultValue: 'dev', description: 'Target environment')
  }
  stages {
    stage('Deploy') {
      steps {
        sh "deploy --env=${params.ENV}"
      }
    }
  }
}

29. Artifacts Archive

  • Definition: Artifacts that are generated as part of a build (e.g., compiled binaries, logs, reports) can be archived in Jenkins for future use. Archiving artifacts ensures they are stored and accessible after the build process is completed.
30. Post-build Actions
  • Definition: Actions or steps that Jenkins can take after a job or build completes. Examples include:
    • Sending notifications (email, Slack, etc.)
    • Archiving build artifacts
    • Publishing reports (such as test results)
    • Triggering downstream jobs.

AWS EKS

Amazon Elastic Kubernetes Service (EKS) is a managed Kubernetes service that simplifies deploying, managing, and scaling containerized applications using Kubernetes on AWS. It provides a reliable and secure platform for running Kubernetes clusters without needing to install, operate, or maintain your Kubernetes control plane.

Key Features

  • Managed Control Plane (Master Node): EKS automates the provisioning and management of the Kubernetes control plane, including automatic patching and updates.

  • Integration with AWS Services: EKS integrates natively with AWS services like IAM for authentication, VPC for networking, Elastic Load Balancing (ELB) for load balancing, Amazon CloudWatch for monitoring, and more.
  • Elastic Scalability: EKS allows you to scale your applications up and down easily with Kubernetes-native tools like Cluster Autoscaler and Horizontal Pod Autoscaler.
  • Highly Available: The control plane spans multiple Availability Zones (AZs) to ensure high availability.
  • Security: Integration with AWS Identity and Access Management (IAM) enables role-based access controls (RBAC), and features like private VPC support and encryption ensure a secure environment.
  • Flexible Worker Node Management: You can choose to run EKS worker nodes on Amazon EC2 instances or AWS Fargate (for serverless containers).
  • Supports Latest Kubernetes Versions: AWS EKS regularly updates and supports new Kubernetes versions, allowing you to take advantage of the latest Kubernetes features and improvements.

Common Use Cases

  • Microservices: EKS helps manage large microservice architectures by orchestrating containers across various environments.
  • CI/CD Pipelines: EKS integrates well with tools like Jenkins, GitLab, and CodePipeline to automate deployment pipelines.
  • Machine Learning: You can run ML workloads using frameworks like TensorFlow or PyTorch, utilizing GPU-backed EC2 instances for training models.
  • Hybrid Deployments: EKS supports hybrid architectures where you can deploy Kubernetes clusters on-premises using Amazon EKS Anywhere.

How to Get Started with EKS

  • Create an EKS Cluster: You can create an EKS cluster using the AWS Management Console, AWS CLI, or an Infrastructure-as-Code tool like Terraform or CloudFormation.
  • Configure kubectl: Connect your local kubectl to your EKS cluster using the AWS CLI and the aws eks update-kubeconfig command.
  • Deploy Applications: Use standard Kubernetes manifests (yaml files) to deploy and manage containerized applications.


Example: Setting up a multinode (3 AWS EC2 nodes) kubernetes cluster using AWS EKS from AWS CLI. We will than deploy a simple NGNIX service into it.

Prerequisites
  • AWS CLI: 
  • AWS IAM user: Create and ensure that your AWS IAM user has the required permissions for EKS, EC2, VPC and IAM.
    • Create an IAM user (Just for a quick demo attached AdministratorAccess policy)
    • Than, login your AWS account with command 'aws configure' from AWS CLI 
  • kubectl: Install Kubernetes command-line tool to interact with your EKS cluster.
  • eksctl (Optional but recommended): A simple CLI tool to create and manage EKS clusters.

Step-1 (Optional): Create a new VPC for the EKS cluster
- It is an optional step, If you don't create a new VPC it will use the default existing one to setup AWS EKS cluster.
- If you don't have a suitable VPC, you can create one using AWS CloudFormation or manually configure it. 
- Here's a simple CloudFormation template to create the necessary VPC components for EKS. 
- Replace <region-name> as per your choice of region e.g. ap-south-1 for mumbai.

aws cloudformation create-stack \
  --region <region-name> \
  --stack-name my-eks-vpc \
  --template-url https://amazon-eks.s3.us-west-2.amazonaws.com/cloudformation/2020-08-12/amazon-eks-vpc-sample.yaml


This command will create a VPC with subnets, route tables, and necessary Internet Gateways suitable for EKS.


Step 2: Create an AWS EKS cluster
- You can create AWS EKS cluster either using eksctl (Recommended) or using AWS Management Console (GUI panel)
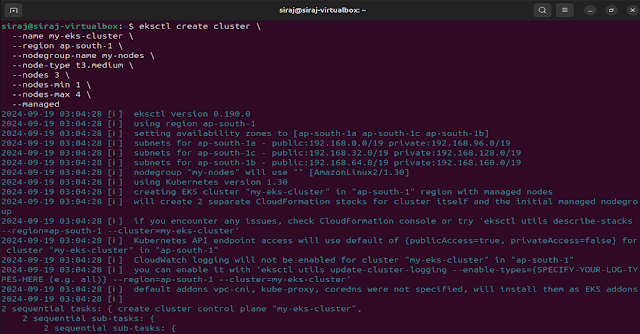
- You can easily create a AWS EKS cluster using eksctl with one following command

eksctl create cluster \
  --name my-eks-cluster \
  --region <region-name> \
  --nodegroup-name my-nodes \
  --node-type t3.medium \
  --nodes 3 \
  --nodes-min 1 \
  --nodes-max 4 \
  --managed


This command creates an EKS cluster in the specified region, creates a managed node group with 3 t3.medium EC2 instances, configures auto-scaling with a minimum of 1 and a maximum of 4 nodes.

- You can verify cluster setup. E.g. Check cluster nodes with commands 'kubectl get nodes'


Step-3: Configure kubectl to access the EKS cluster
- Run the following command to update your kubeconfig
aws eks --region <region-name> update-kubeconfig --name my-eks-cluster

- You can verify that kubectl is properly configured by running
kubectl get services
You should see a list of Kubernetes services, including the kubernetes service for the cluster.


Step-4: Deploy an application (nginx service) into your EKS cluster using kubernetes manifests.

mkdir project_workspace
cd project_workspace

- Create a simple deployment manifest (nginx-deployment.yaml)
apiVersion: apps/v1
kind: Deployment
metadata:
  name: nginx-deployment
spec:
  replicas: 2
  selector:
    matchLabels:
      app: nginx
  template:
    metadata:
      labels:
        app: nginx
    spec:
      containers:
      - name: nginx
        image: nginx:1.19.10
        ports:
        - containerPort: 80

- Apply the manifest
kubectl apply -f nginx-deployment.yaml

- Create a simple service manifest (nginx-service.yaml). Expose the deployment using a LoadBalancer service
apiVersion: v1
kind: Service
metadata:
  name: nginx-service
spec:
  selector:
    app: nginx
  ports:
    - protocol: TCP
      port: 80
      targetPort: 80
  type: LoadBalancer

- Apply the service manifest
kubectl apply -f nginx-service.yaml

- Get the external IP of the service
kubectl get service nginx-service


- You can now fire various kubectl commands against this cluster.


Step-5: Access deployed nginx service using provided external IP


Step-6 (Optional): Enable AWS EKS cluster autoscaler
- You can enable the Kubernetes Cluster Autoscaler to dynamically scale your node group based on workload demand.
- Deploy the kubernetes cluster autoscaler

kubectl apply -f https://github.com/kubernetes/autoscaler/releases/download/cluster-autoscaler-1.19.1/cluster-autoscaler-autodiscover.yaml

- Update the Cluster Autoscaler deployment to include your cluster's name
kubectl -n kube-system edit deployment.apps/cluster-autoscaler

Here, In the container spec, set the following environment variable with your cluster name

- name: CLUSTER_NAME
  value: my-eks-cluster
  
  
Step-6: Clean up resources (Delete the EKS cluster and associated resources)
eksctl delete cluster --region <region-name> --name my-eks-cluster

- Clean up CloudFormation stack (Delete VPC and associated subnets and other resources)
aws cloudformation --region <region-name> delete-stack --stack-name my-eks-vpc

Kubeadm, Kubelet, Kubectl

kubeadmkubectl, and kubelet are core components in the Kubernetes ecosystem, but they serve different purposes. They all work together to create and manage a kubernetes cluster efficiently. Here's a breakdown of their roles,

1. kubeadm
  • Purpose It is a tool used for setting up and configuring kubernetes clusters.
  • Function
    • Helps bootstrap the control plane (master node components like the API server, controller manager, scheduler) and worker nodes in a cluster.
    • Primarily used for setting up and joining nodes to a Kubernetes cluster.
    • Provides commands like kubeadm init (to set up a master node) and kubeadm join (to add worker nodes to the cluster).
    • It doesn’t manage the cluster once it’s set up, but it helps with initial configuration and installation.
  • Pros
    • Simplicity: It streamlines the process of setting up a cluster without requiring deep expertise.
    • Production-ready: Used widely in production environments.
    • Customizable: You can customize various components and networking solutions.
  • When to use
    • Setting up a small to medium-sized kubernetes cluster
    • As part of a CI/CD pipeline: Can be used to automatically bootstrap and tear down clusters for testing.
  • Commands
    • Initialize master node (This command sets up the control plane, API server, etcd, and other components on the master node)
      kubeadm init
    • Join worker nodes to cluster
      kubeadm join <master-ip>:<port> --token <token> --discovery-token-ca-cert-hash sha256:<hash>
    • Create/Recreate a token
      kubeadm token create

      Creates a token valid for 2 hours.

      kubeadm token create --ttl 2h 

      List existing tokens that can be used for nodes to join the cluster

      kubeadm token list
    • Reset a node (master or worker)
      This command is used to reset all Kubernetes components on a node. It will remove all configurations, certificates, and components set up by kubeadm init or kubeadm join

      kubeadm reset

    • Displays the available versions of Kubernetes to upgrade
      kubeadm upgrade plan
    • To perform the upgrade
      kubeadm upgrade apply <version>
    • Shows the current configuration of the cluster, including API server and networking settings
      kubeadm config view
    • Download required container images for kubernetes components (API server, etcd, controller-manager, etc.) based on the Kubernetes version
      kubeadm config images pull
    • Renews all certificates generated by kubeadm
      kubeadm alpha certs renew all
    • Generates a default configuration file that you can modify to customize your cluster initialization
      kubeadm config print init-defaults
    • Inspect cluster cealth

      kubeadm cluster-info 


👉 It's important to note that kubeadm is only one part of the cluster setup, focusing on bootstrapping. It doesn’t provide a solution for setting up a fully managed Kubernetes service, but it integrates well with other tools like kubectl and kubelet to form a complete Kubernetes environment. 

2. kubectl

  • PurposeIts a command line tool to interact with cluster and allow you to manage resources such as pods, services, deployments.
  • Function

    • It communicates with the kubernetes API server (API server is a service in master node) and sends instructions to perform actions like creating or deleting resources.
    • Supports various operations, including creating and managing Pods, services, and deployments.
    • You use commands like kubectl apply, kubectl get pods, kubectl logs, etc., to manage Kubernetes resources.

  • Commands
    • Check cluster info
      kubectl cluster-info
    • Get a list of all nodes
      kubectl get nodes
    • List all pods in the default namespace
      kubectl get pods
    • Get detailed information about a pod, If something goes wrong
      kubectl describe pod <pod-name>
    • View logs from a pod
      kubectl logs <pod-name>
    • Stream logs from a pod
      kubectl logs -f <pod-name>
    • Run a shell in a running pod
      kubectl exec -it <pod-name> -- /bin/bash
    • Delete a pod
      kubectl delete pod <pod-name>
    • View deployments
      kubectl get deployments
    • Scale a deployment (e.g., to 5 replicas)
      kubectl scale deployment <deployment-name> --replicas=5
    • Apply configuration from a file
      kubectl apply -f <config-file.yaml>
    • List all namespaces
      kubectl get namespaces
    • Create a namespace
      kubectl create namespace <namespace-name>
    • Set the default namespace
      kubectl config set-context --current --namespace=<namespace-name>
    • Deploy an application using a YAML file
      kubectl apply -f deployment.yaml
    • Check the status of the deployment
      kubectl get deployments
    • Delete the deployment
      kubectl delete deployment <deployment-name> 


3. kubelet 

  • Purpose: kubelet is the node-agent (a service) that runs on every node in the Kubernetes cluster, including the master and worker nodes. kubelet constantly communicates with the Kubernetes API server to receive tasks (pod specifications) and ensures that the containers described in those pod specs are running on the node.
  • Function
    • Ensures that containers described by the Kubernetes API (in the form of Pods) are running properly.
    • Communicates with the Kubernetes master to receive commands and execute them.
    • It monitors the state of containers and reports back to the Kubernetes control plane (master node).
    • Manages the lifecycle of containers by pulling images, starting, stopping, and restarting containers as needed.
  • Commands: Kubelet is primarily managed through configuration files, but it also supports a number of command-line options and subcommands that are useful for debugging or administrative tasks.

    • Starting kubelet service

              Typically, Kubelet is started as a service on each node via systemd.

      sudo systemctl start kubelet

    • Stopping kubelet

               sudo systemctl stop kubelet

    • Checking kubelet status

      sudo systemctl status kubelet

    • Restarting kubelet

      sudo systemctl restart kubelet

    • Specifying the kubernetes API server

      kubelet --api-servers=http://<api-server-url>:8080

    • Configuring the pod manifest path

      kubelet --pod-manifest-path=/etc/kubernetes/manifests

    • Specifying the Container Runtime (e.g., Docker, containerd, CRI-O)

      kubelet --container-runtime=docker

    • Specifying a Kubeconfig file: The kubeconfig file is used by Kubelet to authenticate with the Kubernetes API server.

      kubelet --kubeconfig=/etc/kubernetes/kubelet.conf

    • Setting the Node IP address

      kubelet --node-ip=<ip-address>

    • Enable debugging via server (start kubelet with a debugging endpoint)

      kubelet --healthz-port=10248 --read-only-port=10255

    • Check the logs generated by Kubelet

      journalctl -u kubelet


Summary

  • kubeadm: A tool for setting up and configuring kubernetes clusters.
  • kubectl: A CLI tool for interacting with the Kubernetes API server for deploying and managing applications on the cluster.
  • kubelet: An agent that runs on nodes to manage containerized applications.

They all work together to create and manage a Kubernetes cluster efficiently.


Example:  Setting up a multinode kubernetes cluster using kubeadm, kubelet, and kubectl. We will than deploy a simple NGNIX service into it.

Step1: We setup two nodes kubernetes cluster (Two AWS EC2 instances one for master node and one for worker node)


Note: Allow port '6443' traffic for EC2 nodes by adding it into security group. it is the port of master node where worker nodes will send request to join the cluster 

Step2: Install docker, kubeadm, kubelet, and kubectl on all nodes of cluster.

sudo apt update -y
sudo apt upgrade -y

sudo apt install docker.io -y
sudo systemctl enable docker
sudo systemctl start docker
docker -v

sudo apt-get update -y
sudo apt-get install -y apt-transport-https ca-certificates curl gpg

curl -fsSL https://pkgs.k8s.io/core:/stable:/v1.31/deb/Release.key | sudo gpg --dearmor -o /etc/apt/keyrings/kubernetes-apt-keyring.gpg

echo 'deb [signed-by=/etc/apt/keyrings/kubernetes-apt-keyring.gpg] https://pkgs.k8s.io/core:/stable:/v1.31/deb/ /' | sudo tee /etc/apt/sources.list.d/kubernetes.list

sudo apt-get update -y
sudo apt-get install -y kubelet kubeadm kubectl
sudo apt-mark hold kubelet kubeadm kubectl

sudo systemctl enable --now kubelet


Step3: Initialize the master node using 'kubeadm init' command

sudo kubeadm init --pod-network-cidr=192.168.0.0/16

The --pod-network-cidr flag is used to specify the CIDR for the Pod network. This is required by certain networking solutions like Weave and Calico.

Save output of this command. It will have a join command for worker node to join the cluster.


Step4: Configure kubectl on the master node

Note: After the 'kubeadm init' completes, follow the instructions printed in the terminal to set up kubectl on your master node for cluster administration

mkdir -p $HOME/.kube
sudo cp -i /etc/kubernetes/admin.conf $HOME/.kube/config
sudo chown $(id -u):$(id -g) $HOME/.kube/config

You should now deploy a pod network to the cluster (for network communication between pods)

#Download calico.yaml
curl https://projectcalico.docs.tigera.io/v3.19/manifests/calico.yaml -O

#I've updated calico.yaml file after downloading and changed variable "apiVersion: policy/v1beta1" to "apiVersion: policy/v1" because I was facing an issue while running following apply command.

#Apply configuration
kubectl apply -f calico.yaml
#Verify installation
kubectl get pods -n kube-system

You should see pods related to Calico, such as calico-kube-controllers and calico-node, running.

Note: At this point, the master node should be up and running. The kubelet service will now manage containers on this node, but there are no worker nodes yet.


Step5: Join the worker node to the cluster

This command was generated for 'kubeadm init' command which we run on the master node. 

You may need to install 'socat' package using 'apt-get -y install socat' before running following command.

sudo kubeadm join <MASTER_IP>:6443 --token <TOKEN> --discovery-token-ca-cert-hash sha256:<HASH>

The kubelet service on the worker node will now run and communicate with the master node. The worker node will also be ready to run containers.


Step6: Manage the cluster with kubectl command on master node

Check the Status of Nodes

kubectl get nodes

Deploy an example NGINX application

kubectl create deployment nginx --image=nginx

Check the status of the deployment

kubectl get deployments

Expose the deployment as a service

To make the NGINX deployment accessible via a NodePort service

kubectl expose deployment nginx --type=NodePort --port=80

Get the service details

kubectl get services

You can get <Worker-Node-IP> with command 'kubectl get nodes -o wide' and <Service-Port> with command 'kubectl get serviceson master node

You can now access the deployed NGINX service with a curl command on worker node

curl http://<Worker-Node-IP>:<Service-Port>


Summary of the example

  • kubeadm was used to initialize the cluster (master node) and join worker nodes.
  • kubectl was used to check node status, deploy an application, and manage the cluster.
  • kubelet was running in the background on each node (master and worker) to manage container runtimes and ensure pods are running.

This workflow demonstrates how kubeadm, kubelet, and kubectl work together to set up and manage a Kubernetes cluster.